Monday, June 24, 2013

Art Class #2a


For now on Mondays, I have two kids who come back the next day as well--so today I did a very simple "recycle themed" project, saving the main one for tomorrow.


If you're looking for something quick and easy, you can try this.

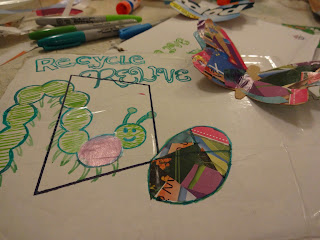
I cut the flaps off of some boxes that were discarded. Then, I drew the outline of the caterpillar and the chrysalis on the flaps.
I cut butterflies out of a thinner cardboard (I used a box that had contained popsicles; same as a cereal or cracker box). And then I found an old magazine and cut pieces out of it to use for decorating.


The picture was supposed to represent taking something old, and giving it "new life." (While I technically haven't gotten organized enough to actually separate my recycled goods and put them in the bins, I do use recyclable materials frequently for projects and things around my house.) The caption on the picture says "Recycle, ReLive."


I had the kids decorate the caterpillars and chrysalises, as well as the butterflies. We folded the wings up, and only glued the bodies of the butterflies to the flap. This gave the picture a tiny bit of dimension.


I had two boys today, and they were not entertained by this butterfly project for very long! They came up with adding string to hang the pictures from. They then got very excited about all my other materials, and began to make their own creations.
(I was hoping they would get a little more involved in decorating their butterfly murals more, but alas--their art is their own. ;) )
One of the boys wanted to use part of a produce storage carton to make eyes
for this cardboard man.
It's nice to give them some leeway to channel their own creative ideas and see what works and what doesn't. 


As I mentioned in my previous post about my "art classes," the theme of the entire course is "Exploring Different Textiles." I just ran across this article, and it amused me in reference to that theme. (I do not plan to share this as an example with the kids, though.) This article does actually have some health-relevant info that is categorized usefully.
You Can Pee a Rainbow: Click here to read article.


Wednesday, June 19, 2013

Awesome Printable Daily Planner


I'm trying to get more organized, and I found this website with printable PDFs of schedules. I printed out a bunch of the Daily Docket 2.0s, because the layout is fantastic--fun, organized, and practical. I generally have problems following schedules and planners, but I can actually see myself using this!

  Check it out for yourself:

                                                     http://simplemom.net/downloads/


Here's a preview. :)


Tuesday, June 18, 2013

Summer Project: Art Class #1


My latest little creative undertaking is hosting "art classes" from my home during the summer. My first program I've dubbed "Exploring Different Textiles," and it consists of five classes. I host each class one per week (but three times a week so more kids can come). These are the classes I'm planning on doing:


  • Art in Tissue Paper
  • Going Green with Art (Art from recyclable goods)
  • Going Green with Art pt.2
  • Art of Food: Lentils
  • Art in Melted Wax


I'll try to keep posting updates about our activities.


For this first class, the kids came in and sat down at a place on the table that already had supplies laid out.
I talked to them briefly--sort of an intro--about different kinds of art: how art is really virtually limitless. The kids had fun coming up with examples of different kinds of art--one of them brought up a hotel made of ice (which I said that yes, architecture can be considered a form of art), another child said that art can be made out of metal. We also talked about pottery, glass work, sidewalk art, and so on.


After this, we began the activity. I generally don't like crafts that are too authoritative in telling you exactly how to do something; I think it defeats the purpose of doing an art project. If I'm telling you exactly how to do something, how is it really your creation? However, the kids I'm working with are ages 6-9 and need some structure, so I couldn't leave it entirely free form. I did try to stress that the project example I made was just that--an example, and that they should decorate the fish in whatever ways they thought best, because it's their project.
My sample fish


Our first class was art with tissue paper. I ended up settling on fish for this project, because I really liked the idea of the tissue paper scales. I went online and found a fish story to go with the craft, and I told them the story while they worked.
(The story is called "The Fisherman's Wife," and the moral of the story is that you should be grateful for what you have, and--as one child put it when we were discussing it afterwards--not be too greedy. Our fish represented the enchanted prince fish from the story.)

Telling the story, I found, was a great way to make the fish project more relevant. It also entertained the children, and gave us something to talk about. After the story, the kids asked questions such as


  • Was it a true story?
  • Was the fish really a prince, or just an enchanted fish who said that so he could escape?
  • Was the wife happy or sad when she lost all the things she'd wished for and went back to living in the little hut?


These were all fantastic questions that gave me an opportunity to ask them what they thought. For example, one boy of a pair of brothers thought the wife was sad, and the other happy. I liked how they had a creative outlet in which to think, as well as to do something creative with their hands.

We taped a piece of yarn to the back of the fish,
so that it was like the fish the fisherman caught. Also,
now the kids can hang it up at home if they want.


For the project, I drew a fish outline based off of pictures of beta (because they're beautiful and seemed fun to decorate). I cut it out and made a "stencil" from it, and used that to cut duplicates when I was sure the project would work with the one I'd made. I cut the fish out of cardboard I had from a leftover lamp box.

I cut scales out of four colors of tissue paper (my work was made faster by layer multiple pieces of tissue paper, so I got more scales for each cut).


I also cut regular squares of each color, as well as strips to use for fins, and the head shapes.


For my sample fish, I folded these with a fan fold for the tail
and lower fins. 


I used pink strips for the top fin of my sample fish.


I think we ended up with some pretty good fish! Here they are:


I didn't get a finished picture of this one,
but the boy who made it colored each section red or blue.
Pretty cool!

Any Marriage Advice?


Photo source:http://www.partystop.ie/
products/foil_balloons/wedding/18ihwedding_doves/


I was at a party last month that was celebrating another young couple getting engaged. I'd gone to school in the same class as the girl for a year, and I was (and am!) beside myself with excitement for her.

My sister-in-law and I finally got a chance to approach her through the crowd of well-wishers, and we hugged her and congratulated her and asked her questions about the upcoming wedding.

At a certain point, she asked if we had any marriage advice for her. I said with a laugh, "Well, we're not entirely experts since we haven't been at it for so long!" (My sister-in-law married my brother three months after I got married, and I got married at the end of last year.)
But following this, it only took me a few moments before something popped into my mind that seemed like something everyone has to deal with.

The advice I gave her--the first thing I thought of--was that no matter how close you are to another person, it takes some adjustment to live with them.
Beside me, my sister-in-law sounded her full-hearted agreement.

No matter how long you know the person before hand and no matter how much time you spend with him/her--living with said person is a whooole different ball game.

It has nothing to do with any kind of deficit on the part of either party; it's just human nature. Getting used to such a huge life style change takes time, growth, and patience (with yourself as much as with the other person!).
 You both came from different households and different lives, and are now teaming up to make your own household.
What is as normal to you as breathing in how you live in the privacy of your home might shock your new spouse--and vice versa.
If the two of you find yourselves on each other's nerves frequently, don't fret: It's normal. 

If you grew up with siblings, this should make sense to you: Remember all the times you and your siblings fought  growing up. You were in each other's space. Now imagine if you'd only seen your siblings for lunch or for an outing a few times a week. You might still not have agreed on everything, but you probably would've been a lot less tense with each other!

Even still, adjusting to living with a spouse is obviously different than living with a sibling. For one thing, as I pointed out to my friend, you can't just punch the other person in the arm when you're frustrated with him/her (though it might be tempting sometimes!).

 I had brothers growing up, so adjusting to living with a male in general (while still an adjustment!) wasn't quite as difficult as it could have been.
For a heterosexual gal who only has sisters, living with a man for the first time might be shocking and horrifying at times: He got what on the bathroom floor?! 
It takes growth, compromise, and effort.


And you're now around the love of your life probably a lot more often and longer than you ever used to be. Don't feel like you have to be cooing in each other's arms every moment, 24/7--and that if you're not, there's something wrong with your relationship.
It's good to have the occasional "me-time" and get together with the girls or just have some time to yourself to relax and unwind.

Feelings of irritation and frustration are normal in the process of getting used to living with another person (even if that person is truly your soul mate).
Try to find ways to deal with your frustration that are constructive for both of you. But even if you slip up once in a while and are slightly less-than-constructive (and we all have those moments ;) ), apologize and make up with your spouse--and try not to be TOO hard on yourself.
And don't act on your feelings in a drastic way; everyone goes through this, and you have the strength to work it out.


7 am

Photo source: http://galaxyninja108.wpengine.com/wp-content/
uploads/2012/12/i-hate-everything-cat-meme.jpg

Stir Fry Recipe


Quick and Easy Stir Fry 

  • Shredded cabbage (I used a pre-packaged "Coleslaw" mix)
  • Matchstick carrots
  • Broccoli (I used fresh; frozen is probably fine too)
  • Snap peas [in pod] (I used fresh; frozen is probably fine too)
  • Sugar snap peas (I used frozen because I didn't have fresh)
  • Brown rice (approx. 1 cup cooked)
  • Soy Vay Toasted Sesame Dressing and Marinade
  • Cooking spray


Spray skillet with cooking spray, and set the burner to just under medium heat. Add all vegetables to pan*, and drizzle with Soy Vay Toasted Sesame sauce; stir frequently to keep from burning.
Once the cabbage starts to get see-through, you'll probably want to turn the burner down to a little over low, and cover the vegetables (to give the broccoli a chance to steam and get tender). Make sure to still stir occasionally.
Once the vegetables seem to be cooked (probably 10-15 minutes--but it really depends on your preference), add brown rice to the skillet and stir into vegetables.
Turn heat back up again and make sure to stir rice frequently to keep it from sticking and burning.
Drizzle a little more Soy Vay Toasted Sesame over the mixture. Cook for 5-7 minutes; remove from heat.
Serve and enjoy.
(I prefer to add a teeny bit of Soy Vay Veri Veri Teriyaki sauce to my plate. It really enhances the flavor!)


*Amounts depend on your preference; just keep in mind that the cabbage and matchstick carrots tend to kind of "go away" once they are cooked with the rest, so you might want to add a little extra of those.


Tuesday, June 11, 2013

Handy Tip #5


CHEATING IS ALLOWED. 

I'm not talking about anything to do with marital fidelity; I'm referring to house-wife cheats.
While forbidden for SATs, there are certain "cheats" in house-wifery that are not only allowed, but encouraged.
Take a look at the pictures below.


This is the breakfast I made myself this morning. Imagine being served this by your hostess. You'd probably be impressed and feel a little bit pampered, no?
This took less than ten minutes to prepare.
I popped the frozen waffles into the toaster oven. While they toasted, I thawed some mixed frozen berries in the microwave. Once the waffles were finished, I cut up one banana over them, and then topped the whole thing with the berries. Voila! Elegant, delicious, magazine-worthy meal that was so ridiculously simple that you could roll out of bed and have it ready before your guests got to the table.

So, as you experiment with your house wife "cheats," and your guests ooh and ahhh over your culinary prowess--just smile graciously and try to keep your pajama pants from peaking out beneath your skirt.